Tuesday, 1 September 2026

How I Troubleshoot a RAC Node Eviction - Step by Step

Last month my phone rang at 2:14 AM. Not an alarm. An actual call from the on-call number, which on our team usually means one thing: something in the cluster fell over. It was one of our 2-node RAC databases. Node 2 had gone down hard, the application team was already seeing connection errors, and the person who called me said the one sentence every DBA dreads: "It just rebooted itself, nobody touched anything."

That's a RAC node eviction. And if you've been an Oracle DBA for more than a few months, you've either seen one already or you will soon. The frustrating part isn't fixing it. Most of the time, the fix is simple. The frustrating part is that when you're half asleep, and the phone is buzzing, it's very easy to open the wrong log first, chase the wrong clue, and burn 40 minutes before you even understand what actually happened.

So this post is not a theory dump on RAC internals. It's the actual sequence I follow, in the order I follow it, when a node gets evicted. Which files I open first, what I'm looking for in each one, and how I narrow down whether it's a network problem, a storage problem, or the node just choking on load. I'll use that 2 AM incident as the running example.

First: 30 seconds on who's talking to whom

Before jumping into logs, it helps to have this picture in your head, because every troubleshooting step below maps to one of these connections.


The part that matters most for eviction troubleshooting is the bottom half of this picture. Every node in a RAC cluster proves it's "alive" to the other nodes in two independent ways:

1. A network heartbeat over the private interconnect. Basically, the nodes pinging each other constantly.
2. A disk heartbeat. Each node writes to the voting disk at a fixed interval, and the others can see that write.

CSSD (Cluster Synchronization Services) is the process watching both. If a node misses too many of either kind of heartbeat (the threshold is controlled by the misscount parameter, 30 seconds by default in most versions), CSSD on the healthy node(s) declares the quiet node dead and, to avoid a split-brain situation where two nodes think they separately own the same data, the cluster forces that node to reboot. That's the eviction. It's not a bug; it's the cluster doing its job and protecting your data. Which is exactly why panicking and just bouncing the instance without checking the logs first usually doesn't help.

Step 1: Don't Touch the Database Alert Log Yet

This is the mistake I see most often, including from myself a few years back. The instance is down, so the instinct is to go straight to alert_<SID>.log. You'll find something like this:

Errors in file .../ORCL2_lmon_12345.trc:
ORA-29740: evicted by instance number 1, group incarnation 7
LMON (ospid: 12345): terminating the instance due to error 29740
Instance terminated by LMON, pid = 12345

And that's it. That's all the DB alert log will ever tell you. The instance was told to die by the clusterware. It's a symptom, not a cause. The actual explanation lives one layer down, in the Grid Infrastructure logs. This is the order I go through, and honestly writing it down as a diagram is the only reason I stopped skipping steps under pressure:


A quick note on paths, since these move around release to release and people always ask me for them: from 11.2 onwards everything sits under $GRID_HOME/log/<hostname>/, with a subfolder per daemon (cssd, crsd, ohasd, etc). If you're on 19c and can't find ocssd.log by browsing, adrci or just find $GRID_HOME/log/$(hostname -s) -iname "*.log" -mmin -180 will get you there fast.

Step 2: Read ocssd.log for the Actual Heartbeat Message

This is where the real story is. In our 2 AM case, ocssd.log on the surviving node (racnode1) had this, trimmed down:

[CSSD]CLSSNM00008: node racnode2 (2) at 90% heartbeat fatal, removal in 2.910 seconds
[CSSD]CLSSNM00008: node racnode2 (2) missed(6) network heartbeats
[CSSD]CLSSNM00008: node racnode2 (2) is impending reconfig, flag 918030, misstime 27090
[CSSD]clssnmSendingThread: sending remove message for racnode2, number 2
[CSSD]clssscExit: CSSD signal 11 received
Removal of node racnode2 (2) from cluster complete

"missed network heartbeats" is the key phrase. If it had said something about the voting disk or a "disk timeout," I'd have gone hunting in storage instead. This one line is basically a fork in the road, and it's the reason I now keep this little decision tree taped (mentally, at least) next to the incident checklist:


In our case, it was squarely the left branch. Network. So the next stop wasn't ASM; it was the network team's territory, except I checked it myself first because waiting for a ticket to get picked up at 2 AM is not a plan.

Step 3: Chase the Network Heartbeat Miss

A few commands I actually ran, in this order:

# confirm which interface is carrying the private interconnect
$ oifcfg getif
eth0  10.10.20.0  global  public
eth1  192.168.10.0  global  cluster_interconnect

# from the surviving node, hammer the private IP of the node that got evicted
$ ping -c 20 192.168.10.12

# check the interface for errors/drops, not just "is it up"
$ ifconfig eth1
$ ethtool -S eth1 | egrep -i "error|drop|discard"

# and don't forget the switch side if you have access
$ netstat -s | grep -i retrans

The ping came back fine a few minutes later. Which is normal and also unhelpful, because by the time you're checking, the blip is usually over. What actually gave it away was ethtool -S on eth1 showing a jump in rx_missed_errors right around 02:11, which lined up almost to the second with the "missed(6) network heartbeats" entry in ocssd.log. We pulled in the network team the next morning, and it turned out to be a flaky SFP module on that host's NIC that had been intermittently dropping packets for a couple of weeks without crossing any monitoring threshold. Nobody had noticed because it never dropped enough packets to trip the switch's own alerting. Just enough, once, to blow past the interconnect's 30-second misscount window.

The point of walking through this isn't the specific root cause. Yours will probably be different. The point is that the log told us which of three very different investigations to start (network vs storage vs OS load), and that saved a good hour of looking in the wrong place.

What It Looks Like When It's Storage, Not Network

Just so this isn't a one-scenario post. If ocssd.log instead shows something like:

[CSSD]clssnmvDiskCheck: (0x7f2a4c003) voting file /dev/oracleasm/disks/VOTE01 not written for 210610 ms
[CSSD]clssnmvDiskCheck: Aborting, 1 of 3 configured voting disks available, need 2

Then you stop looking at the network entirely and go straight to storage: check the ASM alert log for the same time window, run iostat -x 2 (or check your storage array's own latency dashboard) for I/O latency spikes, and if you're on multipath, check whether a path failover was in progress (multipath -ll, or the DM-Multipath logs). Voting disk write timeouts are almost always storage latency, not the disk being literally unreachable. The array is just too slow to answer within the CSS timeout, often during a SAN-side maintenance window or a sudden IO storm from something unrelated sharing the same array.

And the third case: no heartbeat message at all in ocssd.log, node just stopped responding. That's usually the node itself. CPU pegged, memory swapping, or occasionally a massive GC-style pause from something running on the host (yes, even on a "DB-only" server, someone eventually runs an ad-hoc script that eats all the CPU). For that one, OS Watcher or Cluster Health Monitor (oclumon dumpnodeview if it's still running, or CHM's own repository if OSW isn't installed) is what actually saved me the one time I had a genuinely hung node. vmstat from OSW showed run queue length going from single digits to 400+ in about ninety seconds.

Step 4: After You've Found the Cause, Close the Loop

Once the node came back up on its own (self-healing after a clean reboot, which is the usual case) I still ran through this before calling it done:

1. crsctl check crs and crsctl status resource -t on the recovered node. Make sure every resource is actually ONLINE and not just "starting."
2. crsctl query css votedisk. Confirm all voting disks are visible again.
3. Checked the alert log of the recovered instance for a clean startup, no repeat ORA-29740 within the next hour.
4. Opened a ticket with the network team with the exact timestamp and the ethtool output, instead of a vague "cluster had an issue last night."

That last point matters more than people give it credit for. "The node got evicted" is not a root cause and won't get fixed. "eth1 on racnode2 showed rx_missed_errors spiking at 02:11:04, correlating with a 6-heartbeat miss in ocssd.log" gets you a network engineer pulling an SFP module the same day.

Checklist Version: For When You're Getting Paged

1. Alert log just confirms the instance died. Don't stop there.
2. CRS alert log tells you who decided to evict and roughly when.
3. ocssd.log tells you WHY. Network heartbeat, disk heartbeat, or neither.
4. Network miss. Check the interconnect NIC/switch first, with timestamps.
5. Disk miss. Check storage/ASM latency around the same window.
6. Neither. The node was hung. Pull OSW/CHM data for that exact time.
7. Fix the actual cause. Don't just restart things and hope.
8. Write down the timestamp-to-cause mapping before you forget it by morning.

RAC troubleshooting has a reputation for being intimidating, mostly because there are four or five log files involved instead of one. Once you know the order to read them in, and you know that ocssd.log is really the file doing the talking, it stops being scary and becomes a fairly mechanical process. Which is exactly what you want at 2 AM.


I hope this article helped you. Your suggestions/feedback are most welcome.

Keep learning... Have a great day!!!


Thank you,
Amit Pawar
Email: amitpawar.dba@gmail.com
WhatsApp No: +91-8454841011

Tuesday, 30 December 2025

Why Oracle Performs Full Table Scan for DISTINCT Queries

This question was recently asked by a colleague:

"I have an index on a column, but when I run a DISTINCT query on that column, Oracle still performs a full table scan. Why?”
At first glance, this feels counter-intuitive. If an index exists, Oracle should use it, right?
The answer is simple, but understanding why Oracle behaves this way is important for every DBA.
In this post, we’ll walk through a small test case and see exactly when and why Oracle uses (or ignores) an index for a DISTINCT query.

Test Setup

Let’s create a sample table with some data and an index on the column we’ll use in the DISTINCT query.
 

SQL>  create table some_data as select trunc(dbms_random.value(1,100)) val, a.* from dba_objects a;
Table created.
SQL> @desc some_data
 Name                                      Null?    Type
 ----------------------------------------- -------- ----------------------------
 VAL                                                NUMBER
 OWNER                                              VARCHAR2(128)
 OBJECT_NAME                                        VARCHAR2(128)
 SUBOBJECT_NAME                                     VARCHAR2(128)
 OBJECT_ID                                          NUMBER
 DATA_OBJECT_ID                                     NUMBER
 OBJECT_TYPE                                        VARCHAR2(23)
 CREATED                                            DATE
 LAST_DDL_TIME                                      DATE
 TIMESTAMP                                          VARCHAR2(19)
 STATUS                                             VARCHAR2(7)
 TEMPORARY                                          VARCHAR2(1)
 GENERATED                                          VARCHAR2(1)
 SECONDARY                                          VARCHAR2(1)
 NAMESPACE                                          NUMBER
 EDITION_NAME                                       VARCHAR2(128)
 SHARING                                            VARCHAR2(18)
 EDITIONABLE                                        VARCHAR2(1)
 ORACLE_MAINTAINED                                  VARCHAR2(1)
 APPLICATION                                        VARCHAR2(1)
 DEFAULT_COLLATION                                  VARCHAR2(100)
 DUPLICATED                                         VARCHAR2(1)
 SHARDED                                            VARCHAR2(1)
 CREATED_APPID                                      NUMBER
 CREATED_VSNID                                      NUMBER
 MODIFIED_APPID                                     NUMBER
 MODIFIED_VSNID                                     NUMBER

SQL> create index some_data_val_indx on some_data(val);
Index created.


SQL>
SQL>
SQL>  exec dbms_stats.gather_table_stats(null, 'SOME_DATA', cascade=>true);
PL/SQL procedure successfully completed.

SQL> set autot trace
SQL>  select distinct val from some_data;
99 rows selected.

Execution Plan
----------------------------------------------------------
Plan hash value: 443606636

-------------------------------------------------------------
| Id  | Operation          | Name      | Rows  | Bytes | Cost (%CPU)| Time     |
--------------------------------------------------------------------------------
|   0 | SELECT STATEMENT   |           |    99 |   297 |   632   (1)| 00:00:01 |
|   1 |  HASH UNIQUE       |           |    99 |   297 |   632   (1)| 00:00:01 |
|   2 |   TABLE ACCESS FULL| SOME_DATA |   116K|   341K|   628   (1)| 00:00:01 |
-------------------------------------------------------------
Statistics
----------------------------------------------------------
         36  recursive calls
          0  db block gets
       2340  consistent gets
          0  physical reads
          0  redo size
       2207  bytes sent via SQL*Net to client
        463  bytes received via SQL*Net from client
          8  SQL*Net roundtrips to/from client
          4  sorts (memory)
          0  sorts (disk)
         99  rows processed


Even though an index exists on VAL, Oracle chooses a full table scan.

What If We Force the Index Using a Hint?

SQL> select /*+ index(some_data) */ distinct val from some_data;
99 rows selected.

Execution Plan
----------------------------------------------------------
Plan hash value: 443606636
-------------------------------------------------------------
| Id  | Operation          | Name      | Rows  | Bytes | Cost (%CPU)| Time     |
--------------------------------------------------------------------------------
|   0 | SELECT STATEMENT   |           |    99 |   297 |   632   (1)| 00:00:01 |
|   1 |  HASH UNIQUE       |           |    99 |   297 |   632   (1)| 00:00:01 |
|   2 |   TABLE ACCESS FULL| SOME_DATA |   116K|   341K|   628   (1)| 00:00:01 |
-------------------------------------------------------------
Hint Report (identified by operation id / Query Block Name / Object Alias):
Total hints for statement: 1 (U - Unused (1))
-------------------------------------------------------------

   2 -  SEL$1 / SOME_DATA@SEL$1
         U -  index(some_data)

Statistics
----------------------------------------------------------
          1  recursive calls
          0  db block gets
       2312  consistent gets
          0  physical reads
          0  redo size
       2207  bytes sent via SQL*Net to client
        486  bytes received via SQL*Net from client
          8  SQL*Net roundtrips to/from client
          0  sorts (memory)
          0  sorts (disk)
         99  rows processed


Result
• Same execution plan
• Index hint is ignored
• Full table scan is still chosen

Oracle clearly doesn’t want to use the index here.

Why Is Oracle Ignoring the Index?

The reason is straightforward:
A B-Tree index does NOT store NULL values.
Since VAL is nullable, Oracle cannot guarantee that all distinct values can be derived by scanning only the index. To be 100% correct, it must scan the table to account for possible NULLs.
That’s why:
• Full table scan is chosen
• Index hints are ignored

What If the Column Is NOT NULL?

Let’s change the column definition.

SQL>  alter table some_data modify(val not null);
Table altered.


SQL>  select distinct val from some_data;

99 rows selected.
Execution Plan
----------------------------------------------------------
Plan hash value: 1329759908
--------------------------------------------------------------------------------------------
| Id  | Operation             | Name               | Rows  | Bytes | Cost (%CPU)| Time     |
-------------------------------------------------------------
|   0 | SELECT STATEMENT      |                    |    99 |   297 |    69   (8)| 00:00:01 |
|   1 |  HASH UNIQUE          |                    |    99 |   297 |    69   (8)| 00:00:01 |
|   2 |   INDEX FAST FULL SCAN| SOME_DATA_VAL_INDX |   116K|   341K|    65   (2)| 00:00:01 |
-------------------------------------------------------------
Statistics
----------------------------------------------------------
          0  recursive calls
          0  db block gets
        236  consistent gets
          0  physical reads
          0  redo size
       2207  bytes sent via SQL*Net to client
        463  bytes received via SQL*Net from client
          8  SQL*Net roundtrips to/from client
          0  sorts (memory)
          0  sorts (disk)
         99  rows processed


Oracle now uses an INDEX FAST FULL SCAN, resulting in:
• Lower cost
• Fewer consistent gets
• Multiblock reads
• No table access

This is a significant improvement.

What If the Column Cannot Be Changed to NOT NULL?

In real systems, modifying column definitions is not always possible.
In that case, we can help Oracle by explicitly excluding NULLs.

SQL> alter table some_data modify (val null);
Table altered.

SQL> select /*+ index_ffs(some_data) */ distinct val from some_data where val is not null;

99 rows selected.

Execution Plan
----------------------------------------------------------
Plan hash value: 1329759908
-------------------------------------------------------------
| Id  | Operation             | Name               | Rows  | Bytes | Cost (%CPU)| Time     |
--------------------------------------------------------------------------------------------
|   0 | SELECT STATEMENT      |                    |    99 |   297 |    69   (8)| 00:00:01 |
|   1 |  HASH UNIQUE          |                    |    99 |   297 |    69   (8)| 00:00:01 |
|*  2 |   INDEX FAST FULL SCAN| SOME_DATA_VAL_INDX |   116K|   341K|    65   (2)| 00:00:01 |
-------------------------------------------------------------
Predicate Information (identified by operation id):
---------------------------------------------------

   2 - filter("VAL" IS NOT NULL)

Statistics
----------------------------------------------------------
          1  recursive calls
          0  db block gets
        236  consistent gets
          0  physical reads
          0  redo size
       2207  bytes sent via SQL*Net to client
        512  bytes received via SQL*Net from client
          8  SQL*Net roundtrips to/from client
          0  sorts (memory)
          0  sorts (disk)
         99  rows processed


Oracle now safely uses the index because:
• NULL values are explicitly filtered
• Index contains all required rows

Key Takeaways
1. B-Tree indexes do not store NULL values
2. DISTINCT on a nullable column often results in a full table scan
3. Oracle may ignore index hints if correctness cannot be guaranteed
4. DISTINCT on a NOT NULL column can use an index efficiently
5. Adding WHERE column IS NOT NULL can enable index usage
6. INDEX FAST FULL SCAN is especially efficient when the index covers all required columns


I hope this article helped you. Your suggestions/feedback are most welcome.

Keep learning... Have a great day!!!


Thank you,
Amit Pawar
Email: amitpawar.dba@gmail.com
WhatsApp No: +91-8454841011


Sunday, 27 April 2025

How to move a datafile that was added by mistake on local storage to shared location


In Real Application Cluster (RAC) environments, data files need to be on shared storage. It is possible that a data file gets added to a tablespace on the local filesystem instead of the shared storage subsystem by mistake. 

When another instance tries to contact the local file it will error out with:

ORA-01157: cannot identify/lock data file 17 - see DBWR trace file
ORA-01110: data file 17: '/home/oracle/test01.dbf'

Typically, this happens when the data file needs to be added to ASM but the '+'-sign is omitted when specifying the disk group. In this case, the data file will be created in the default directory specified by the 'db_create_file_dest' parameter, which defaults to $ORACLE_HOME/DBS.
In the scenario below, it was created by mistake on a different local storage.

This post explains how you can resolve this issue when the database is in archivelog mode and when the database is running in noarchivelog mode.

Note: 

Starting in 12c the process can be simplified using the new "online move" feature.

You need to have all the archive files since the creation of the datafile (when it was added to the tablespace)

1.  Find out the exact file name, file location, size and file number: 

SQL> select file_id, file_name, bytes, online_status from dba_data_files where tablespace_name = '<tablespace_name>';
FILE_ID FILE_NAME                          BYTES     ONLINE_
---------- ---------------------------------------- ---------- -------
16 +DATA/RAC/DATAFILE/test.309.1199529051  104857600 ONLINE
17 /home/oracle/test01.dbf                 104857600 ONLINE <<----


2. Put the datafile offline

SQL> alter database datafile 17 offline;
Database altered.


3. Recreate the datafile on the shared storage, please note that you need to do this on the node where the physical file resides and you need to specify the size retrieved in step 1

SQL> alter database create datafile '/home/oracle/test01.dbf' as '+DATA' size 100M;
Database altered.


4. Check the datafile status on second node.It will show RECOVER

SQL> select file_id, file_name, bytes, online_status from dba_data_files where tablespace_name ='TEST';
   FILE_ID FILE_NAME                                     BYTES ONLINE_
---------- ---------------------------------------- ---------- ------
        16 +DATA/RAC/DATAFILE/test.309.1199529051    104857600 ONLINE
        17 +DATA/RAC/DATAFILE/test.276.1199530103              RECOVER


5. Now Recover the datafile

SQL> recover datafile 17;
Media recovery complete.


6. Place the datafile back online

SQL>alter database datafile 17 online;
Database altered.


7. Verify the datafile status

 select file_id, file_name, bytes, online_status from dba_data_files where tablespace_name ='TEST';

   FILE_ID FILE_NAME                                     BYTES ONLINE_

---------- ---------------------------------------- ---------- ------

        16 +DATA/RAC/DATAFILE/test.309.1199529051    104857600 ONLINE

        17 +DATA/RAC/DATAFILE/test.276.1199530103    104857600 ONLINE


I hope this article helped you. Your suggestions/feedback are most welcome.

Keep learning... Have a great day!!!


Thank you,
Amit Pawar
Email: amitpawar.dba@gmail.com
WhatsApp No: +91-8454841011

Sunday, 29 September 2024

Patching a DB System in OCI


Let's learn how to patch an Oracle Database 19c - 19.23 to 19.24 using the OCI DB System.

1. Validate the current version :

Login to the OCI Cloud Console

Navigate under Oracle Database --> Database (BM/VM) - BM - Bare Metal / VM - Virtual Machine


Now navigate to the DB System in question click on the Node and login to the box to validate the current version: 19.23.0.0.0

You can do the same check using the Database Command Line(CLI)


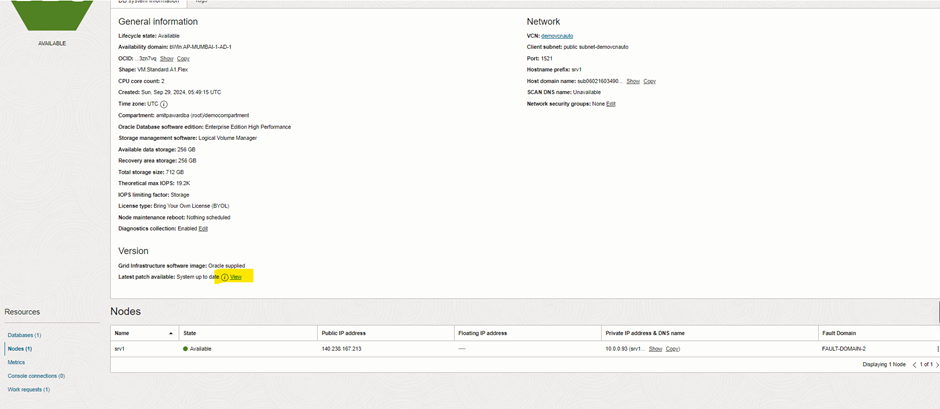
2. Check the latest version available.

Now navigate to the console:

Click on the DB Systems section --> At the bottom left of the screen click on

Databases

Click on Databases

Now navigate to the Database Page.

Scroll down to the section where it is says Version:

Click on the View hyperlink to view the latest version:

Click View latest Version Parch

As you can see below, the latest is 19.24. Let's Patch this database.

Latest 19.24 version

Note : Patching database required downtime, so perform this activity during maintenance window.

3. Run precheck


Once precheck is completed, now apply the actual patch.

4. Apply Database Patch

Navigate to the Database and the hamburger menu and click on Apply

Note with Apply, it does a pre-check and then applies the patch

You will now see the status change from Available to Applying

Applying the Patch 19.24.0.0.0

You can monitor the status using CLI using the below command.

[root@srv1 ~]# dbcli list-jobs

[root@srv1 ~]# dbcli describe-job -i a276b6a6-af06-4baa-ac9d-dd45c55f9ae7

Now the database patch has completed successfully.


4. Verify the database Patch

Let's verify the same using database command line(CLI)

Successful Patch 19.24.0.0.0

Congratulation..!! We have successfully patched an OCI bound DB system!


I hope this article helped you. Your suggestions/feedback are most welcome.

Keep learning... Have a great day!!!


Thank you,
Amit Pawar
Email: amitpawar.dba@gmail.com
WhatsApp No: +91-8454841011

Saturday, 14 September 2024

Oracle Exadata Smart Flash Cache

Exadata Smart Flash Cache, part of the cell (storage) server, temporarily holds redo data before it is securely written to disk. Exadata Storage Servers feature extensive flash storage, with a portion reserved for database logging and the rest utilized for caching user data.

On a full rack Exadata server, there is approximately 5 TB of flash cache available, offering considerable storage capacity for caching.

The Exadata Database Machine’s exceptional performance is largely due to two key features in the Exadata Storage Server Software, which optimize the flash hardware:

  1. Exadata Smart Flash Cache – enables the staging of active database objects in flash.
  2. Exadata Smart Flash Logging – accelerates database logging tasks.

These features, combined with Exadata’s mission-critical resilience, make it an ideal platform for Oracle Database deployment. Flash cache management is automatic, but users can influence caching priorities through hints, and administrators have the ability to disable it for specific databases.

Intelligent Caching: 

The Smart Flash Cache recognizes different database I/O patterns, prioritizing frequently accessed data and index blocks for caching. Control file and file header operations are also cached, and database administrators can adjust caching priorities to suit workload demands.

However, monitoring the cache contents is not straightforward. Oracle provides the list flashcachecontent command via the cellcli tool, but it lacks summary options and only displays object numbers.

 Example- 

CellCLI> list flashcachecontent where objectNumber = 43215 detail;
        cachedKeepSize:         0
        cachedSize:             42384
         dbID:                   191919191
        dbUniqueName:           TEST
         hitCount:               18
         missCount:              1
         objectNumber:           43215
         tableSpaceNumber:       8

Data that is Never Cached in Flash Cache:

Backup related I/O is not cached
Data pump I/O is not cached
Datafile formating data is not cached
Table scans do not monopolize the cache
I/Os to mirror copies are managed intelligently. 

FlashDisk-based Grid Disks:

To speed up I/O performance for random reads, Exadata V2 introduced solid state storage called Flash Cache.

•Flash cache is configured as a cell disk of type FlashDisk, and just as grid disks are created on HardDisk cell disks, they may also be created on FlashDisk cell disks.

•FlashDisk type cell disks are named with a prefix of FD and a diskType of FlashDisk. 

 Creating FlashDisk based Grid Disks:

 It is not recommended to use all of your Flash Cache for grid disks. When creating the Flash Cache, use the size parameter to hold back some space to be used for grid disks.

 CellCLI> create flashcache all size=300g;

 •We can create grid disks using the remaining free space on the Flash Disks, using the familiar 'create griddisk' command.

 CellCLI> create griddisk all flashdisk prefix='RAMDISK‘;

CellCLI> list griddisk attributes name, diskType, size – where disktype='FlashDisk‘;

 The beauty of Flash Cache configuration is that all this may be done while the system is online and servicing I/O requests.

Data Processing modes of Flash Cache:

 1. Write through mode -  Excellent for absorbing repeated random reads.

2. Write-back mode - Best for write intensive workloads commonly found in OLTP applications

 By default, Exadata flash cache Operates in write-through mode. DBA’s can influence caching priorities by using CELL_FLASH_CACHE storage attribute for specific database objects.

 1. Write Through mode 

 Please read the data points and understand write and read operations in exadata server using write through mode.


In write-through mode, smart cache work as follows

 - For Write Operations, CELLSRV writes data to disk and sends acknowledgment to the DB so it can continue without interruption. Then, if the data is suitable for caching, it is written to smart flash cache. Write performance is not improved or diminished using this method. However, if a subsequent read operation needs the same data , it is likely to benefit from the cache. When data  is inserted into a full cache, a prioritized least recently used (LRU) algorithm.  

 - For Read Operations (on cached data), CELLSRV must first determine if the request should use the cache.This decisions is based on various factors including the reason for the read, the CELL_FLASH_CACHE setting for the associated object, and the current load on the cell. If it is determined that the cache should be used , CELLSRV uses an in-memory hash table, to quickly determine if the data resides in flash cache. If the request data is cached , a cache lookup is used to satisfy the  I/O request.

 - For Read Operations (On un-cached data) that cannot be satisfied using flash cache, a disk read is performed and the requested information is sent to the database. Then if the data is suitable for caching , it is written to the flash cache.

 2. Write Back mode


In this mode, write Operations work as follows

 - CELLSRV receives the write operation and uses intelligent caching algorithms to determine if the data is suitable for caching. 

- If the data is suitable for caching, it is written to flash cache only. If the cache is full, CELLSRV determines which data to replace using the same prioritized least recently used (LRU) algorithm as in write through mode.

- After the data is written to flash, an acknowledgement is sent back to the database.

- Data is only written back to disk when it is aged out of the cache. 

 Note the following regarding write back flash cache

- Write back flash cache allows 20 times more write I/Os per second on X3-4 systems, which makes it ideal for write intensive applications that would otherwise saturate the disk controller write cache. 

- The large flash capacity on X5 systems means that for many applications a very high proportion of all I/O can be serviced by flash.

- An active data block can remain in write back flash cache for months or years. Also, flash cache is persistence through power outages, shutdown operations, cell restarts and so on.

- With write back flash cache, data redundancy is maintained by writing primary and secondary data copies to cache on separate cell(storage) servers.   

- Secondary block copies are aged out of the cache and written to disk more quickly than primary copies. Hence, blocks that have not been read recently only keep the primary copy in cache, which optimizes the utilization of the premium flash cache.

- If there is a problem with the flash cache on one storage server, then operations transparently fail over to the mirrored copies (on flash or disk) on other storage servers. No user intervention is required. The unit for mirroring is the ASM allocation unit. This means that the amount of data affected is proportional to the lost cache size, not the disk size.

- With write back flash cache, read operations are handled the same as a write trough flash cache.  

LIST CELL shows the current value.

CELLCLI> list cell attributes flashcachemode

CELLCLI> list cell detail

How to enable Write-Back Flash Cache:

Methods are available:

1. Rolling Method - Assuming that RDBMS & ASM instances are UP and enabling Write-Back Flash Cache in One Cell Server at a time

2. Non-Rolling Method - Assuming that RDBMS & ASM instances are DOWN while enabling Write-Back Flash Cache

Note: Before performing the below steps, Perform the following check as root from one of the compute nodes:

Check all griddisk “asmdeactivationoutcome” and “asmmodestatus” to ensure that all griddisks on all cells are “Yes” and “ONLINE” respectively.

# dcli -g cell_group -l root cellcli -e list griddisk attributes asmdeactivationoutcome, asmmodestatus

Check that all of the flashcache are in the “normal” state and that no flash disks are in a degraded or critical state:

# dcli -g cell_group -l root cellcli -e list flashcache detail

exadata01cell01: WriteThrough
exadata01cell02: WriteThrough
exadata01cell03: WriteThrough

1.     Rolling Method:

(Assuming that RDBMS & ASM instances are UP and enabling Write-Back Flash Cache in One Cell Server at a time)

Login to Cell Server:

Step 1. Drop the flash cache on that cell

#cellcli –e drop flashcache

Flash cache exadata01cell01_FLASHCACHE successfully dropped

Step 2. Check the status of ASM if the grid disks go OFFLINE. The following command should return 'Yes' for the grid disks being listed:

 # cellcli -e list griddisk attributes name,asmmodestatus,asmdeactivationoutcome

         DATAC1_CD_00_exadata01cell01   OFFLINE  Yes
         DATAC1_CD_01_exadata01cell01   OFFLINE  Yes
         DATAC1_CD_02_exadata01cell01   OFFLINE  Yes
         DATAC1_CD_03_exadata01cell01   OFFLINE  Yes
         DATAC1_CD_04_exadata01cell01   OFFLINE  Yes
         DATAC1_CD_05_exadata01cell01   OFFLINE  Yes
         DBFS_DG_CD_02_exadata01cell01  OFFLINE  Yes
         DBFS_DG_CD_03_exadata01cell01  OFFLINE  Yes
         DBFS_DG_CD_04_exadata01cell01  OFFLINE  Yes
         DBFS_DG_CD_05_exadata01cell01  OFFLINE  Yes
         RECOC1_CD_00_exadata01cell01   OFFLINE  Yes
         RECOC1_CD_01_exadata01cell01   OFFLINE  Yes
         RECOC1_CD_02_exadata01cell01   OFFLINE  Yes
         RECOC1_CD_03_exadata01cell01   OFFLINE  Yes
         RECOC1_CD_04_exadata01cell01   OFFLINE  Yes
         RECOC1_CD_05_exadata01cell01   OFFLINE  Yes

Step 3. Inactivate the griddisk on the cell

# cellcli –e alter griddisk all inactive

 Step 4. Shut down cellsrv service

# cellcli -e alter cell shutdown services cellsrv 

 Stopping CELLSRV services...

The SHUTDOWN of CELLSRV services was successful.

Step 5. Set the cell flashcache mode to writeback 

# cellcli -e "alter cell flashCacheMode=writeback"

 Cell exadata01cell01 successfully altered

 Step 6. Restart the cellsrv service 

# cellcli -e alter cell startup services cellsrv 

Starting CELLSRV services...

The STARTUP of CELLSRV services was successful.

Step 7. Reactivate the griddisks on the cell

# cellcli –e alter griddisk all active
GridDisk DATAC1_CD_00_exadata01cell03 successfully altered
GridDisk DATAC1_CD_01_exadata01cell03 successfully altered
GridDisk DATAC1_CD_02_exadata01cell03 successfully altered
GridDisk DATAC1_CD_03_exadata01cell03 successfully altered
GridDisk DATAC1_CD_04_exadata01cell03 successfully altered
GridDisk DATAC1_CD_05_exadata01cell03 successfully altered
GridDisk DBFS_DG_CD_02_exadata01cell03 successfully altered
GridDisk DBFS_DG_CD_03_exadata01cell03 successfully altered
GridDisk DBFS_DG_CD_04_exadata01cell03 successfully altered
GridDisk DBFS_DG_CD_05_exadata01cell03 successfully altered
GridDisk RECOC1_CD_00_exadata01cell03 successfully altered
GridDisk RECOC1_CD_01_exadata01cell03 successfully altered
GridDisk RECOC1_CD_02_exadata01cell03 successfully altered
GridDisk RECOC1_CD_03_exadata01cell03 successfully altered
GridDisk RECOC1_CD_04_exadata01cell03 successfully altered
GridDisk RECOC1_CD_05_exadata01cell03 successfully altered

Step 8. Verify all grid disks have been successfully put online using the following command:

# cellcli -e list griddisk attributes name, asmmodestatus
         DATAC1_CD_00_exadata01cell02   ONLINE         Yes
         DATAC1_CD_01_exadata01cell02   ONLINE         Yes
         DATAC1_CD_02_exadata01cell02   ONLINE         Yes
         DATAC1_CD_03_exadata01cell02   ONLINE         Yes
         DATAC1_CD_04_exadata01cell02   ONLINE         Yes
         DATAC1_CD_05_exadata01cell02   ONLINE         Yes
         DBFS_DG_CD_02_exadata01cell02  ONLINE         Yes
         DBFS_DG_CD_03_exadata01cell02  ONLINE         Yes
         DBFS_DG_CD_04_exadata01cell02  ONLINE         Yes
         DBFS_DG_CD_05_exadata01cell02  ONLINE         Yes
         RECOC1_CD_00_exadata01cell02   ONLINE         Yes
         RECOC1_CD_01_exadata01cell02   ONLINE         Yes
         RECOC1_CD_02_exadata01cell02   ONLINE         Yes
         RECOC1_CD_03_exadata01cell02   ONLINE         Yes
         RECOC1_CD_04_exadata01cell02   ONLINE         Yes
         RECOC1_CD_05_exadata01cell02   ONLINE         Yes

Step 9. Recreate the flash cache 

# cellcli -e create flashcache all
Flash cache exadata01cell01_FLASHCACHE successfully created

If the flash disk is used for flash cache, then the effective cache size increases. If the flash disk is used for grid disks, then the grid disks are re-created on the new flash disk. If those gird disks were part of an Oracle ASM disk group, then they are added back to the disk group, and the data is rebalanced on them based on the disk group redundancy and ASM_POWER_LIMIT parameter.

Step 10. Check the status of the cell to confirm that it's now in WriteBack mode:

# cellcli -e list cell detail | grep flashCacheMode 
flashCacheMode:         WriteBack                            
 

Step 11. Repeat these same steps again on the next cell to the FINAL cell. However, before taking another storage server offline, execute the following making sure 'asmdeactivationoutcome' displays YES:

 # cellcli -e list griddisk attributes name,asmmodestatus, asmdeactivationoutcome
         DATAC1_CD_00_exadata01cell01   ONLINE  Yes
         DATAC1_CD_01_exadata01cell01   ONLINE  Yes
         DATAC1_CD_02_exadata01cell01   ONLINE  Yes
         DATAC1_CD_03_exadata01cell01   ONLINE  Yes
         DATAC1_CD_04_exadata01cell01   ONLINE  Yes
         DATAC1_CD_05_exadata01cell01   ONLINE  Yes
         DBFS_DG_CD_02_exadata01cell01  ONLINE  Yes
         DBFS_DG_CD_03_exadata01cell01  ONLINE  Yes
         DBFS_DG_CD_04_exadata01cell01  ONLINE  Yes
         DBFS_DG_CD_05_exadata01cell01  ONLINE  Yes
         RECOC1_CD_00_exadata01cell01   ONLINE  Yes
         RECOC1_CD_01_exadata01cell01   ONLINE  Yes
         RECOC1_CD_02_exadata01cell01   ONLINE  Yes
         RECOC1_CD_03_exadata01cell01   ONLINE  Yes
         RECOC1_CD_04_exadata01cell01   ONLINE  Yes
         RECOC1_CD_05_exadata01cell01   ONLINE  Yes

After changing the flashcache modes on all cells, check if flashcache modes are changed to write-back for all cells.

CellCLI> dcli -g ~/cell_group -l root cellcli -e "list cell attributes flashcachemode"
exadata01cell01: WriteBack
exadata01cell02: WriteBack
exadata01cell03: WriteBack

  2.     Non-Rolling Method:

 (Assuming that RDBMS & ASM instances are DOWN while enabling Write-Back Flash Cache)

Step 1. Drop the flash cache on that cell

# cellcli -e drop flashcache 

 Step 2. Shut down cellsrv service

 # cellcli -e alter cell shutdown services cellsrv 

 Step 3. Set the cell flashcache mode to writeback 

 # cellcli -e "alter cell flashCacheMode=writeback" 

 Step 4. Restart the cellsrv service 

 # cellcli -e alter cell startup services cellsrv 

 Step 5. Recreate the flash cache 

 # cellcli -e create flashcache all

 Write-Back Flash Cache Not Required for DiskGroup:

Note: We can disable Write-Back Flash Cache diskgroups like RECO not requiring this feature. This can save space in the flash cache.

CACHINGPOLICY could be used to change the flash cache policy of the griddisk.

Before changing the cache policy from default to none, ensure there is no cached data in flash cache for the grid disk:

CellCLI> create griddisk all harddisk prefix=RECO, size=1006, cachingPolicy="none“;

 OR

CELLCLI>ALTER GRIDDISK grid_disk_name FLUSH;

CELLCLI>ALTER GRIDDISK grid_disk_name CACHINGPOLICY="none";

 Flushing the data from Flash Cache to Disk – Manual Method:

The data which is not been synchronized with griddisk can be synchronized using the FLUSH option.

CELLCLI>ALTER GRIDDISK grid_disk_name FLUSH

 Use the following command to check the progress of this activity:

 CELLCLI>LIST GRIDDISK ATTRIBUTES name, flushstatus, flusherr

 Reinstating WriteThrough FlashCache:

1.   To reinstate Writethrough caching, FlashCache must first be flushed

2.   FlashCache must then be dropped and cellsrv stopped.

Step 1. CELLCLI> alter flashcache all flush

Step 2. CELLCLI> drop flashcache

Step 3. CELLCLI> alter cell shutdown services cellsrv

Step 4. CELLCLI> alter cell flashCacheMode = WriteThrough

Step 5. CELLCLI> alter cell startup services cellsrv

Monitoring Flash Cache Usage:

CELLCLI> list metricdefinition attributes name, description where name like '.*_DIRTY‘ 

CD_BY_FC_DIRTY

Number of unflushed bytes cached in FLASHCACHE on a cell disk

FC_BY_DIRTY

Number of unflushed bytes in FlashCache

FC_BY_STALE_DIRTY

Number of unflushed bytes in FlashCache which cannot be flushed. Because cached disks are not accessible

GD_BY_FC_DIRTY         

Number of unflushed bytes cached in FLASHCACHE for a grid disk

 SUMMARY

Use the Write-Back Flash Cache feature to leverage the Exadata Flash hardware and make Exadata Database Machine a faster system for Oracle Database Deployments.  Flash Storage inside the Oracle Exadata Database Machine is used completely as Flash Cache by default, effectively working as an extension of the Database Buffer Cache  and delivering faster Access together with a very high IO per Second rate which is especially important for OLTP. Additionally, we may take a part of the Flash Storage to build ASM diskgroups upon it. Files placed on these diskgroups will reside permanently on Flash Storage – no Caching needed.